January 31, 2011

Monday's Discussion - Thought About Upcoming Expansions

Everyone knows that the expansions have been released of what they are somewhat. Here is my predictions:

Operation Cyclone - Artillery Strike
It has already been announced. It looks like what it says a bunch of artillery stuff. With the 2 new mechs having artillery shots and the commend squad having artillery strike. The only thing that comes to mind is a bunch of explosive stuff. The new tiles are landing craft this should be pretty neat to use

Operation Paperclip - Blurhreuz Attacks
This one I predict to be out this year in summer between June and September. It is a bit more World War Wierd. This is the zombies and the gorillas. Maybe some werewolves and vampire who knows, but the game will change with these extras to the game. It says it will take place on a castle so that will be interesting for tiles and terrain. Also maybe we’ll see a glimpse of the Russian models.

Operation Seelow - Battle for Britain
This hopefully will be at the end of this year. It will also hopefully have a lot of Russian stuff and introduce the factions other countries units like British for Allies, and Japanese for Axis. It will be a tech boost too so a lot of new walkers and weapons will be in the game.

Operation Downfall - Vrill Invasion
This will be the beginning next year. It will be the full invasion of the Vrill the rest of the Aliens of the one Axis found. This will probably be more tech for the other factions to battle the aliens, because think about it, it’s WWII would the tech we had then be able to even put a dent in the Alien's Armor.

Operation Harpoon - Air Strike
Dog fights and other neat stuff with aircrafts. There will be bombing runs and airplane fighting. Also to be able to stop these there will be AA guns to shoot them out of the sky. The aircrafts will have to be constantly moving they will never be able to stay in one place.

I also don’t think this will be the end of the game I think there will be more and they haven’t released them to the public.

January 30, 2011

Sundays Play by Play

First thing I modified Wolverine's card someone on Facebook gave me an idea so I tweaked it. Check it out.
So last night my friend and I decided to played Scenario 2: Patrol. The objective was still kill each other but it only last 8 turns and the setup is odd. My friend and I decided that since I was defenders last game he would be this game.

My friend went first in on the deployment. He was attackers and all his men had to be deployed on the middle strips as mine had to be deployed on the outside.
I went first for the first turn. I moved my Flamer Squad and killed 3 of his Rocket Squad. Then his squad moved denied me cover and returned fire killing my squad. Then my MG squad finished off his rocket squad. My Pounder took out his MG squad. My hotdog and Rocket Squad and his Luther, Ludwig, and laser squad moved into position.
Next round, turn 2, I went first again popped out my Pounder and fired at his Ludwig only dealing 1 HP to it. Then I returned fire take 3 HP. I moved my Rocket Squad and fired at his Laser Squad dealing 6 hits points and he killed 4 models and 1 HP to Sigrid. His Luther shot at my Pounder taking the last HP from it. He returned fire with the Laser Squad dealing only 1 damage to my squad and I made a soft cover save. My MG squad hid from the Luther and my Hotdog moved closer.

On turn 3 he went first, his laser squad fired at my Rocket squad killing 3 of them. I returned fire dealing 1 HP and he gave it to Sigrid. His Luther moved close to the rocket squad and my MG sqaud moved into cover. His Ludwig moved into position to fire at my Hotdog and I moved twice.
On turn 4 I went first my Hotdog tried to destroy his Ludwig not landing a blow to destroy it.His Ludwig returned fire destroying my Hotdog. I moved my MG squad back and he moved his Laser squad. I moved my Rocket squad in cover and he moved his Luther and fired at my MG squad landing 3 HP and I made all 3 soft cover.

On the 5th turn I moved my MG squad double back. He then moved his Luther closer but remained being blocked from my Rocket sqaud so I moved them back a squad. His Ludwig moved forward and his Laser Sqaud moved back.
On turn 6 he when first. His Luther moved and fired the cannon at my MG squad killing 3 and its MG at my Rocket squad dealing 1 wound and I took it on Joe. The rocket squad returned fire dealing 3 points on hit Luther. His Ludwig moved closer to my men and my MG moved forward. His Laser Squad moved back a little more.
On turn 7 I went first trying to deal the killing blow to the Luther but no luck. His Ludwig moved and fired at my MG squad leaving 1 model left. My MG squad moved closer to his Luther and his Luther finished off the Rocket squad. His Laser squad moved close to my only guy.
On turn 8 we didn't even role his Luther finished my single guy and the game ended with Victory to my friend.
Thoughts about this mission:
The Defenders have a huge advantage of the Attackers. Their force is close together and can work as one. While the Attacker have to be spread out throughout the map. 

January 28, 2011

Show Off Friday

Today I wanted to show 2 squads I've painted from the Dust Tactics Box. I painted the same squad with 2 different paint schemes.

Snow Squad

 
Industrial Squad


January 27, 2011

Homegrown Thursday

Here's a couple of House Rules I designed that made for my boards and friendly plays.

Landmines
-Before any models are deployed each player picks a square and writes it down.
-The square can be any one of them except the squares of the opponents deployment.
-When an enemy unit moves on top of the square the mines detonate.
Mine 4/1 3/1 2/1 1/1 3/1 2/1 2/1 1/1 -  -  - - - -
-Air Vehicles will not detonate the mine.
-Tanks with higher armor value will detonate the mines even though no damage will happen.
-Mines detonate only once.
-No Sustain fire.

Home Made Units
Today is The Phantom, Wolverine, and Sabertooth. Check every Wednesday for new units.
My whole story between the 2 is that Wolverine went through Weapon X earlier than normal and made Sabertooth jealous so he went to a nazi weapon x program.


I plan on rotating every week between tanks and superheroes.
I upload the new cards to the top of the card page. Tanks will go on the bottom of the page and superheroes will go on the top.
Remember if you want to make your own cards send me an email and I'll send you the file you must have microsoft publisher.

January 26, 2011

Hobby Wednesdays - How to Paint Allie Infantry

To Paint Figures You Will Need:
Paints
Camo Green
Dark Angels Green
Codex Grey
Chaos Black
Devlan Mud (Wash)
Gryphonne Sepia (Wash)
Space Wolf Grey
Badab Black (Wash)
Bestial Brown
Scorched Brown
Dark Flesh
Tallarn Flesh (Foundation)
Skull White
Asurmen Blue
Kommando Khaki
Boltgun Metal
Chainmail
Mithril Silver
Scorched Brown
Bleached Bone
Baal Red (Wash)
Brushes
Round 2 1 0 1/0 2/0

If you know how to drybrush and want to you can with the 2 or 1 brush for the green otherwise you do not need the 2 for drybrushing. You will need to 1 drybrush for bigger areas of washes. You will need a 1 0 1/0 and 2/0 for painting. 1 and will be for base colors and fine detail washes and 0, 1/0, and 2/0 are for details.

Today’s Painting is just the basic painting no details like symbols or squad distinction.

First thing I did was determine what colors I wanted to do my models. For my MG squads I did one with green clothing and white armor and one with green clothing and black armor the pictures will be posted Friday. For my Rocket Squads I am doing them in their white smocks and have green underside. Their armor will be Metal.

Where the green was going to be I washed with Devlan Mud.

Then I went over the areas with 1:2:5 Chaos Black, Dark Angels Green, and Camo Green.  That’s the closest color I found to the primer color. You may have to add some more or less of Camo Green so I would do 3 drops mix it and add a drop at a time and mix until you have the color. Then I went over that with 1:2 Dark Angels Green and Camo Green.  Green is done.

Now the tricky part is the white smocks. I base coated with Space Wolf Grey. This builds up the colors to make a pure white. Next I applied 1:1 Space Wolf Grey and White and washed with 3:1 Water Asurmen Blue. This gives a diluted light blue color and brings out the shadows. I reapplied the 1:1 Wolf Grey and White and highlighted with White. When you are done you should get a bluish white color.

Now the for the boot coverings, the gloves, and the fur in the hoods I did a reverse highlighting which means I started with a light color and highlighted with a dark. I painted the boots Kommando Khaki. The washed with Devlan Mud and Gryphonne Sepia in that order. Then I highlighted it with Bestial Brown. It gives the browns a nice leather look to them, but looks great on any brown.

Next I did black. I painted the boots rubber shoe parts and the guns stock parts straight Chaos Black. Then I highlighted it with 1:1 Chaos Black and Codex Grey, then again 1:2 Chaos Black and Codex Grey.  Black is done.

Next I did the metallic. I painted the Goggles rim, the Gun’s metallic parts, the armor, and if there is a Shovel on the back pack it too with Boltgun Metal. I washed the metal with Badab Black. Then went over the wash with Chainmail and Highlighted with Mithril Silver. Metallic is done.

Now for faces. I start with Tallarn Flesh. Then put a 10:1 water dark flesh wash. Then a 15:2:1 Water, Scorched Brown, and Chaos Black. Then applied 2:1 Tallarn Flesh and Bleached Bone. Then Highlighted with Bleached Bone. Then highlighted with 1:1 Bleached Bone and White. To show more realism I did an asurmen blue wash where under the eyes a little would be and baal red on the lips.

Now you have painted a figure only 4 left to go for that squad.

After you are done painting you should clear coat you figures I would use a flat varnish spray if gives it a realistic look and not show glossy

Tips

I like to do one color at a time and paint that color on all my figures before I move onto another color.

Remember to have 2 cups of water on for regular color and one for metallic colors. Otherwise your regular colors with have a metallic sheen to them.

You can do as many highlights as you would like to make it more realistic I just showed the basics. Greens you could build up to Rotting Flesh, Blacks to Codex or Fortress Grey, Browns to Khaki, and Flesh to White. I wouldn’t do metallic highlights past Mithril Silver because that would involve using white.

Remember to water down your paints not too much otherwise you will just get a wash but enough to make the paint flow off of the brush smoothly. You may want to get a cheap model like a heroclix or something and practice if you are a bit rough on painting.

Also these colors are just the basics for allies you can do them in any different combinations I just choose these for my squad and use for an example. You can also do camo on your men using these combinations and making patches.

Later I will show detailing you models like adding symbols and a worn look to the armor. 

Pictures Below Show Step by Step. Sorry Some of the steps are missing when I took the pic it came out blurry and I can't exactly go back if I already moved on to the next color. You should still be able to get it if you follow the instruction and the pictures.
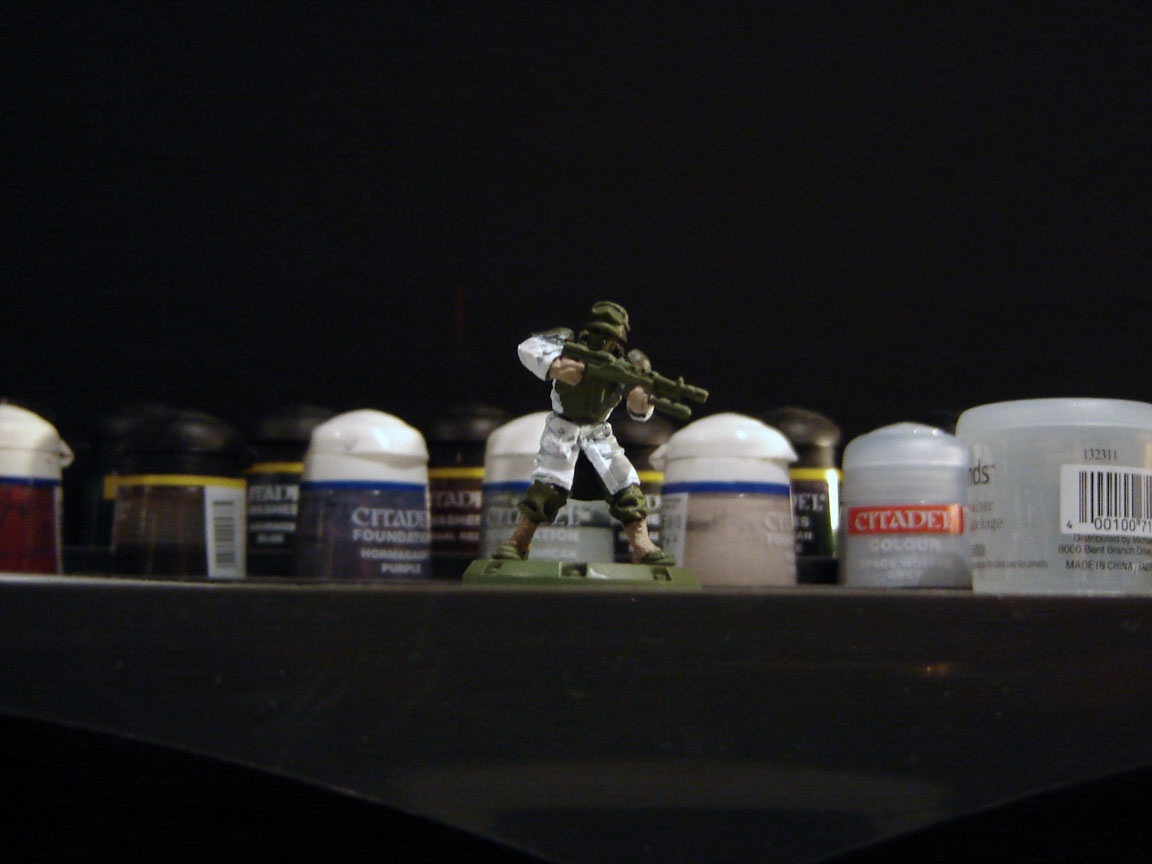

My Paint Area


Finished


Make your own Loth

Since this is Hobby Wednesday I figure I would post this up.
From the folks at Color Blind Model Painter Blog has step by step instructions on how to make you own Loth.
Here

January 25, 2011

Review Tuesdays

Allie Infantry
Today in my reviews I am reviewing the 3 squads in the Dust Tactics main box set
Recon Boys - are a good anti infantry unit. With the machine gun and the assault rifles with grenade launchers these guys are great for taking out a squad of men.
Pros:
The MG is great for weakening a unit.
The 2 extra UGLs give a little extra firepower.
Medium range weapons
Cons:
While good for anti infantry no true anti anti weapon. If your enemy kills off your entire army except for this unit and they have a walker left it's game over.

The Gunners
The gunners are the anti tank unit in the Allie force. The are equipped with a Bazooka.
Pros:
Can take out a tank in 2 turns
Has 4 UGLs
Medium range weapons
Cons:
Not really an anti infantry squad the Bazooka only gets 1 shot for armor 2  infantry.
Bazooka has 1/3 which means you can on fire once and get 3 damage. So need atleast 2 turns to destroy a tank and one get 1 shit per turn to do it.

The BBQ Squad
These are the assault squad the are universal at taking out infantry as well as vehicles. Their flamer is powerful but they are also equipped with shotguns able to easily take out squads of men at a time.
Pros:
Fast ability can move 2x and fire.
Flame can kill a walker or a hero with one blow.
Shotguns and flames combo can kill instantly an entire squad.
Demo charges is nice for taking out tanks as well.
Cons:
Very short range every weapon is at range 1.
The flamer and the demo charges are 1/ x which means they only get 1 shot per turn.

Each of these teams have pros and cons that equal out as a whole force.

Next Week's will be the Axis Infantry.

January 24, 2011

Discussion Mondays


Using Other Games' In Dust Tactics

Some people have been using other company's games' models as part of Dust. My thoughts about it are go ahead the more models you can add to the table will make the game more exciting and play differently. Now there are some things you need to thing about when playing with these models.
1) Does this model relate to the WWII look? I've been seeing people use AT-43 models and while they look great most of the models are very sci-fi so be aware of that.
2) Something you won't see as a card I make will be a Superman one. Why? Because it would be like got slapping the Nazis. He's way too powerful to be in the Dust universe.
3) Use the same scale or slightly smaller. The models need to be the closest scale otherwise they won’t look right next to each other. Dust figures are 35mm and the vehicles are 1/48th scale. You may be also able to use 28mm hero scale models like Warhammer scale.

I’m just saying don’t go overboard on models and making rules for them. You want to have fun on both sides not just one side. Making the game balance is very important for the game. When I create these cards I make a counter balance, by either making an equal or bumping up the points. I also don’t make the units be gods on the table. At 10+points the superheroes may be overpowered compared to the other units but you can get 4 squads for one hero. Have fun creating new units and expanding the Dust universe.

January 23, 2011

No Play by Play folks went to a Warhammer 40k Tournament instead.

January 21, 2011

Show Off Friday

Today I wanted to show my first 2 super heroes from WWII Captain America and Red Skull.

Captain America
Red Skull


Also BigWill on Fantasy Flight Games Forum Posted these.


And he's finished modeling this his KILLROY!


Can't wait to see it fully painted
If you have any models for Dust painted send me an email with some pics and I'll post them on here on Fridays.

January 20, 2011

Dust Tactics Demo in Pasadena, California

Friday January 21st at 6:00 PM
There will be Demo-Games at Game Empire in Pasadena, California.
Game Empire Site for directions.

Homegrown Thursday

Transports
-Has a transport capacity of X squads. (A squad is 5 men and can also include a hero.)
-Takes 2 actions to get into transport and 1 action to get out.
-Open transport - the squad can shoot out of the transport but can be shot at too. The unit shooting phase happens on that unit’s activated turn not the tanks activation turn.
-Units receive Soft Cover one open transports with armor 1-3 and Hard Cover open transports with armor 4 or better.
-Squads disembarking from a transport moves to a square next to the tanks.
-If the transport is destroyed with a squad in it the squad has to take hits.
Armor 1 2 3 4 1 2 3 4 5 6 7 1 2 3
1 2/1 2/1 1/1 1/1 - - - - - - - - - -
2 2/1 2/1 1/1 1/1 - - - - - - - - - -
3 1/1 1/1 - - - - - - - - - - - -
4 1/1 1/1 - - - - - - - - - - - -
5 1/1 - - - - - - - - - - - - -
6 1/1 - - - - - - - - - - - - -
7 - - - - - - - - - - - - - -
Building Rules
-Buildings always give soft cover and when shooting at units through a solid wall they receive hard cover.
-It takes two moves to climb up one level. The unit must be in the same square as the building to climb up levels.
-Units cannot shoot or assault between levels. ex: you cannot shoot a unit above or below you.
-Line of sight is blocked if the unit is 2 x 1 on height x length. ex: if you are two levels high you cannot shoot at 1 square in front of you.
-Walkers and vehicles cannot climb up levels.
-They cannot be in the same square unless the model can physically fit in the square without interrupting the building.
Trenches
-Trenches take one move to get in and two moves to get out. ex. The unit jumps in the trench but has to climb to get out.
-Shooting into or out of a trench give the target soft cover.
-Vehicles can only cross over a trench if there is a bridge to pass over. They cannot be in a trench.
-Vehicles and units can be in the same square if the vehicle is on a bridge but the unit is in the trench.
-Units under the bridge are blocked by line of sight if shooting or be shot at from out of the trench. ex: a unit cannot be shot at if the unit is in front of them but if the unit is in the trench
with them then they have line of sight.
-Rocket Launchers and Grenades roll an extra dice when shooting into a trench due to the units being in a trench and are organized closely together.
-Bridges cannot be destroyed.

Now on to new units this weeks new units are tanks: the Sherman, the Panzer III and transports: the Jeep and the Volkswagen.


I plan on rotating every week between tanks and superheroes.
I upload the new cards to the bottom of the card page. Tanks will go on the bottom of the page and superheroes will go on the top.

January 19, 2011

Hobby Wednesdays - How to Magnetize your Walkers

To magnetize the walkers you will need:
Exacto Knife
Dremel Tool with a cutting piece
Drill with 1/8bit or a little bigger
Allie Walker:
6x 1/8 X 1/16 rare earth magnet per walker:
2 for the cannon barrel - If you buy the soon walker pack you’ll need 4 for each arm because it comes with 1 body and 3 configurations.
2 for the search light
2 for the .50 cal
Also since I haven’t seen how it connects you will need ones for the missile rack in the new walker kit.
2x 1/2 X 1/16 rare earth magnet per walker:
2 for the turret
Axis Walker:
7x 1/8 X 1/16 rare earth magnet per walker:
2 for each arm so 4 total - If you buy the soon walker pack you’ll need 4 for each arm b/c it comes with 1 body and 3 configurations.
3 for the torso
2x 1/4 X 1/16 rare earth magnet per walker:
2 for the torso
Before you glue make sure all magnets are aligned and in the right direction.
So first is the Allie Walker he is pretty simple.
Take the Turret and flip it upside down.
Inside the little opening put your 1/8” magnet in there and then take another magnet from the outside to move your magnet into place of the gun holes.
Once positioned squirt glue on a 1/8” magnet to hold it in place.
Repeat until you have your search light’s spots placed.

Then cut off the pins for the gun and the search light to slide in the holes.
Glue a 1/8” magnet to underneath both pieces.


For the Turret slip a 1/8” magnet inside the barrels connector or cut the connector (Pounder) and glue.
 Then drill a bigger hole in the turret’s barrel and put one 1/8” magnet in there.

Now take the 1/2” magnet and glue to the inside of the bottom chassis close to the edge.

Then do the same for the turret.

Once you’re done all the parts should connect.
 
The Axis walkers are easy but not all that simple.
First use an exacto knife and twist it in the hole until it is big enough. You can also try to drill a bigger hole in the holes where the arms are supposed to go with a drill instead.
Place a 1/8” magnet in each of them and glue.
Then hack off the connector on the arms to the body with the Dremel tool or an exacto knife.
 Glue a 1/8” magnet to where the connector was.
 Then take the Dremel tool and hack off the torso connector to the legs.
Place a 1/4" magnet in the hole of the legs and glue one to the body.
Mine was lopsided so I placed 3x 1/8” magnets to stabilize it around the hole.
And you are done with the Axis Walker
Notes: If you do this right you can make all your walkers have interchangeable torsos and weapons.
You can magnetize your figures by ripped them apart and cutting off the connector and replacing it with a magnets, but I haven’t done it.

Next week - Will discuss painting the figures.