May 8, 2011

Dust Tactics - Regional Tournament - Groovy Gecko's Comics and Games - May 7th, 2011

So yesterday was the first of the 5 regional tournament for Fantasy Flight Game's Dust Tactics. I just happen to live down the street from the store so luckily I got to go. Unfortunately only 4 of us showed up. I have a bunch of photos of the tournament. The players were Chris, Lob, Alex (who I runs the scenarios for the play by play with), and myself. The prizes were already preset to be the overall winner gets the Trophy and Certificate, the Allie player with the most points gets the painted Hot Dog, and the Axis player with the most points got the painted Luther. Everyone who showed up automatically received a Dust Tactics Regional Pin, a Dust Tactics Regional Patch, and a Dust Tactics Artwork.We also played 3 of my custom scenarios under the Links sections of this blog. We played King of the Hill, Capture and Control, and Seize Ground. It was 200 points with allowed up to only 1 hero.


1st  Game Chris and I getting our stuff ready to deploy.
 Lob and Alex also getting ready.
 Chris's Pounder with a Tank Commander and an Armorcast .50 cal MG.
 My walkers moving out of the deployment area.
 Chris 2nd round of thinking of what to do next.
 Me doing the same thing.
 Alex watching Lob's turn.
 Lob thinking of what to do next.
 Alex's army
 Lob's Army
 Round 3 rolling for initiative
 My Pounder shooting Chris's Pounder.
 Chris's Pounder returning fire.
 Alex's turn of his 3 units remaining.
 Lob watching Alex's turn
 Chris's remaining models on the board.
 Setting up for Game 2 Chris and Alex.
 Setting up for Game 2 Lob and I.
 Turn 1 my first unit.
 Lob's Mickey.
 Turn 1 after everything has entered.
 Alex's turn 2.
 Chris's turn 2.
 Alex's recon grenadiers.
 Lob's turn 2.
 Chris' Pounder, BBQ Squad, and Bot Hunters in Game 3.
 Lob looking up the stats for his unit, for game 3.
 My Pounder moving out of the deployment area.
 Myself moving Alex's squad for him closer to me.
 Alex thinking about his next move.
 Myself talking to Chris waiting for Alex's turn.
 Me moving my Mickey.
 Alex holding his ground.
I got 1 Draw and 2 Wins, Chris got 2 Draws and 1 Win, Lob got 1 Win, 1 Draw, and 1 Loss, and Alex got 3 Losses. Results: Overall Winner: Myself, Most Points Allies: Chris, Most Points Axis: Alex.

Myself receiving the Certificate.
 Myself receiving the Trophy.
Chris receiving his painted Hot Dog.
 Alex receiving his painted Luther.

May 5, 2011

Homegrown Thursday - King Tiger and M46 Patton

So today I decided to make the King Tiger and M46 Patton. The Patton came out in 1950 but I figure it's close enough to 1947 and with the increase of production it was developed quicker than normal.

May 4, 2011

Hobby Wednesday - A little 'how to paint non-winter axis'.

theguildllc from FFG - Dust Tactics - Forums

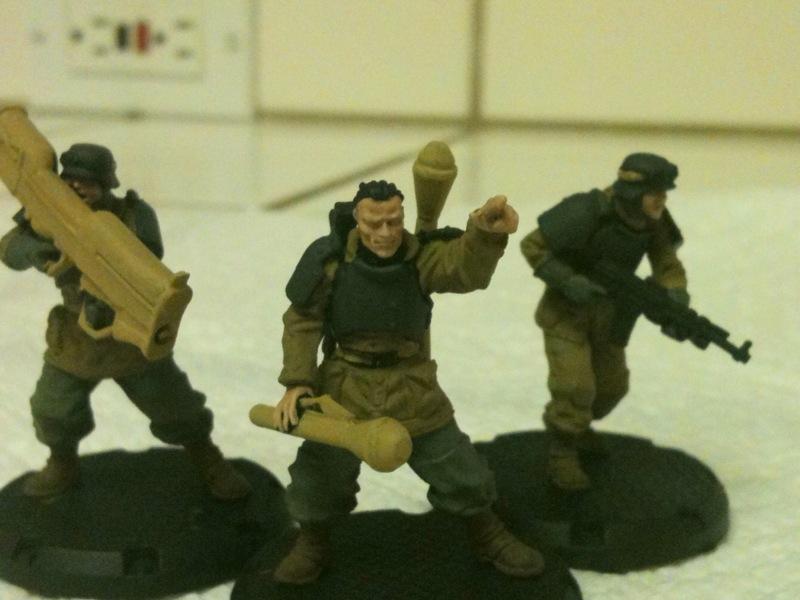
A couple requests for my paint scheme has resulted in this effort at explaining how I paint my axis troops.  The only camera I have access to is an iPHONE camera so let me just appologize for the poor picture quality now....  So what follows is a little article on how to paint non-winter camo germans in Pea Dot camo smocks.  I do mostly Pea Dot as it was the last major production run of camo by the end of the war.  There was another pattern being developed that was resistant to being seen by infra-red light imaging but it looks too much like US Army WoodLand BDU so I dont use it.  I sometimes do Oak Leaf A/B Summer/Fall but not this time...
I've been painting, with middling skill, for about 15 years and during that time have compiled various 'formulas' from various sources.  So, some of my techniques might be cribbed from other sources, I dont remember where I got them and claim no origanality.
I always paint from a black base coat (citadel chaos black primer).  I try to use three different colors for each color applied, a shade, a base, and a highlight.  I paint in layers, as in I start at the 'bottom' layer and work my way out.  That usually means starting with skin, then clothes, belts and battle rattle, weapons and details.  I always use a pallet and add a little water to my paint.
Anyway, here's the colors used:
Citadel colors:
Chaos Black Primer
TallarnFlesh
Elf Flesh
Bleached Bone
Devlan Mud Wash
Badab Black Wash
Adeptus Battlegrey
Vallejo colors use:
70873 Field Drab
830 German Fieldgrey WWII
70826 German Camo Med. Brown
70914 Green Ochre
70995 German Grey
979 German Camo Dark Green
821 German Camo Beige
xxx? white
xxx? German Camo Bright Green

Start by painting the 'bottom' layer, the skin.  Mix Tallarn Flesh and Elf flesh about 60/40, this is your shade layer.  Mix in a bit more Elf Flesh to about 40/60, thats your 'base' or mid color.  To highlight the skin add some bleached bone (25%ish) to the mix and apply only to the very raised areas.
Now for the base coats.  In this step I block in all the base colors.
Camo tunics get 70873 U.S. Field Drab.
Pants, hats, gloves, and headscarves get 830 German Field grey WWII.
Boots, 70826 German Camo Med. Brown.
Webbing, pouches, belts, goggle straps, panzerfaust and panzerschreck are painted 70914 Green Ochre.
Armor, helmets and gasmask cannisters, 70995 German Grey.
You may need to put a couple of coats on depending on how much you thin the paints.


Once the base coats are dry, wash them with Devlan Mud, except the areas painted German Grey, paint those areas Badab Black.  Note: do not wash the skin, its done already.


Once the washes are dry its time to go back and reapply the base coats.  Go back and add a little bit of Bleached Bone to the base colors (except German Grey) and paint the raised surfaces of the inked base colors.  For the 70995 German Grey, add a little White and paint over the inked surfaces.  Add a little more white and paint the edges of the German Grey areas for your highlight.  Remember to leave the darkened (inked) reccessed areas dark, its the shadows.  For the guns, edge highlight with Adeptus BattleGrey, mix in a bit of white for extreme highlights.


To do the Pea Dot camo smocks paint some blobs of 979 German Camo Dark Green blobs over about 1/3 (or less) of the smock.  Paint dots of 979 in the remaining areas.  Next paint some 821 German Camo Beige blobs onto the remaining smock covering 1/3 or less of the remaining smock.  Paint dots of 821 onto the 979 Green and the 70873 Field Drab.  Now go back and add dots of 70873 over the Green and Beige.  Add dots of Green over the Beige.  And to finnish it off add dots of German Camo Bright Green all over the smock.  So you should have a smock thats roughly 1/3 US Field drab blobs, 1/3 German Camo Dark Green blobs, 1/3 German Camo Beige, dots of each color ver the blobs of eachother color and German CAmo Bright Green over all of it.


Thats the basics of how to paint non-winter camo germans.  You can add details, like painting in the eyes and adding decals and basing, but thats up to personal taste really.  I mean you dont want to base yours like mine, youd want to base em to match your forces or table.


Any questions or clarification needed let me know.  Hope this helps.

May 3, 2011

Discussion - Making homemade units

So today I wanted to discuss what factor I use to determine what the stats are for making a card. I base all my stats off of the sherman do to its stats being the closest to the Pounder. Its 75mm cannon's stats are only 1 less than the Pounder's 17pdr. With that being said I configure a basic stat chart for tanks on how to calculate them all. As for weapons just play test them and don't go extreme on the unit. Just because they are your unit doesn't mean it has to be a god on the board. My tanks I try to make a standard. Unless they are suppose to be warmachines or gods like the German Landkreuzers or Superman.
The calc chart is Here.

New Terrain

New Terrain has been made available at Dust-Models.com. It consists of tank traps and rubble. Also premium painted bases are also available they look like cracked ice on the tops and are painted an ice blue color.

May 2, 2011

Announcement - Dust Night in Washington State

Where: Olympic Cards and Comics 4230 Pacific Ave., Lacey, WA 98503

When: Tuesday Nights from 6-10pm

Website: http://www.olympiccardsandcomics.com/

Phone Number: (360) 459-7721

It's on the calender for details.

Also don't forget first regional tournament at Groovy Gecko's Comics and Games in Williamsburg, VA this Saturday. I'll see you there. It too is on the calender for details.

April 27, 2011

Hobby Wednesday - Using Pink Foam to Make Terrain

 So today I thought I would show some terrain making ideas. I like using pink foam for my terrain tool. I use a styrofoam cutter to cut and sculpt my object. There are 2 kinds of styrofoam cutters. First one is a string attached to 2 rods that allow it to heat up and cut the object this one is good for cutting out the main shape of the terrain. Second one is like the first picture below which is a single rod. This one can be used to get the basic shape and also used to sculpt.
First I would draw out the shape you want. Then cut the basic shape of the object. Next you would start cutting the edges to round the object out and add details to the object. Once your done I do not spray these with any kind of spray paint it will erode and you will not have a object anymore. Look at my examples below to show you ideas of how it's done. For the wall section I cut the basic L shape then I went in a cut a smaller wall section. Then I carved the bricks and concrete sections. next I cut the wall following a brick every other line while cutting down the wall.