Showing posts with label Hobby. Show all posts

April 18, 2012

Hobby Wednesday - English Recon

So today's hobby tutorial is pretty simple but allows you to expand your models. I decided to make my Recon Boys look like English Highland Guard. I got the legs and heads from Victoria Miniatures. Just rip off the legs and head off of recon boys and glue these new legs and head. For the

http://www.victorialamb.com/store.html


 Musician is the squad leader. I just cut the arms off and put them and the head on.

The rest of the squad.


Custom Hero


October 11, 2011

Halloween Special - Buidling Your Own Dust Armor

So today's Hobby is Dust allies' armor. It will only be showing the chest armor today. So I can't really give you a template to use because it would be different for each person. I used foam core to made the armor. The best way to get measurements is to lay on the foam ore and get you shoulder to arm pits marked, your waste marked, and your neck then connect the dots with curves.
I can give you what I made for the front. I put extra to the end to trim when I fit it.
Next is the back same thing applies.
To bend the foam core by making cuts on the backside where the armor is to bend. Here's an example of what I did.
Next will be the shoulder pads.

September 21, 2011

Hobby Wednesday

Today's hobby article is a how to paint the boots of your men allies or axis. I will be using Allies Recon soldiers for the example. These examples can be used for any unit either allies axis or soviets. Also sorry for the inconsistent model placement just follow the text and it should line up.

Unpainted primed Allies Recon Boys.
Model 1 White: I started off with a Space Wolf Grey for the base coat and did the shoe part black.
Model 2 Cold Grey: I started also off with a Space Wolf Grey for the base coat and did the shoe part black.
Model 3 Light Green: I started off with Rotting Flesh and for the shoe also based it black.
Model 4 Warm Grey: I started with Codex Grey and for the shoe I painted it Space Wolf Grey
Model 5 Brown: I started with Kammando Khaki and based the shoe with Black.
Model 1 Light Green:Washed the green with Gryphonne Sepia.
Model 2 Warm Grey: Washed the grey with Badab Black and the shoe with Asurmen Blue.
Model 3 Cool Grey:Washed with Asurmen Blue.
Model 4 White: Washed with 50/50 Water Asurmen Blue.
Model 5 Brown: Washed with Devlan Mud then Gryphonne Sepia.
Model 1 Brown: Went over the brown with Beastial Brown and went over the black with 35/65 Codex Grey/Black.

Model 2 White: Went over with white/Space Wolf Grey went over the black with 35/65 Codex Grey/Black.
Model 3 Warm Grey: Went over the gray with Codex Grey went over the shoe with Space Wolf Grey.

Model 4 Cool Grey: Went over the gray with Space Wolf Grey went over the black with 35/65 Codex Grey/Black.
Model 5 Light Green: Went over the green with Rotting Flesh went over the black with 35/65 Codex Grey/Black.
Model 1 Brown: Went over the brown with Beastial Brown and went over the black with 35/65 Codex Grey/Black.

Model 2 White: Went over with white/Space Wolf Grey.

Model 3 Warm Grey: Went over the gray with Codex Grey.

Model 4 Cool Grey: Went over the gray with Space Wolf Grey.

Model 5 Light Green: Went over the green with Rotting Flesh.

Finish Product
Model 1 White: Highlighted the White with pure white and highlighted the black with 50/50 Codex Grey/Black.
Model 2 Warm Grey:Highlighted the Gray with Fortress Grey and highlighted the Space Wolf Grey with 50/50 Space Wolf Grey and White.
Model 3 Light Green:Highlighted the Green with 50/50 Rotting Flesh and White and highlighted the black with 50/50 Codex Grey/Black.
Model 4 Cool Grey: Highlighted the Gray with 50/50 Space Wolf Grey and White and highlighted the black with 50/50 Codex Grey/Black.
Model 5 Brown: Highlighted the brown with 50/50 Khaki and Bestial Brown and highlighted the black with 50/50 Codex Grey/Black.  Front
 Back
And you are done. Next will be the under clothing of the models and prepping for the coat.

August 11, 2011

Show Off Friday

The reason I didn't do a hobby Wednesday is because I was working on my Gorilla Hunters. Check them out and tell me what you think.


August 2, 2011

Hobby Wednesday - Painting Gorilla Fur

Today is a simple way to paint Gorilla fur for the Axis Gorillas.
So first I just left the grey primer on model.
 Then wash the fur area with Badab Black wash
 Then Highlight with Codex Grey
Then rewash with Badab Black.

Then you can highlight lighter with Codex Grey again if you like but it will come out pretty well with just the second wash.

July 26, 2011

Hobby Wednesday - How to Paint Fire and Explosions

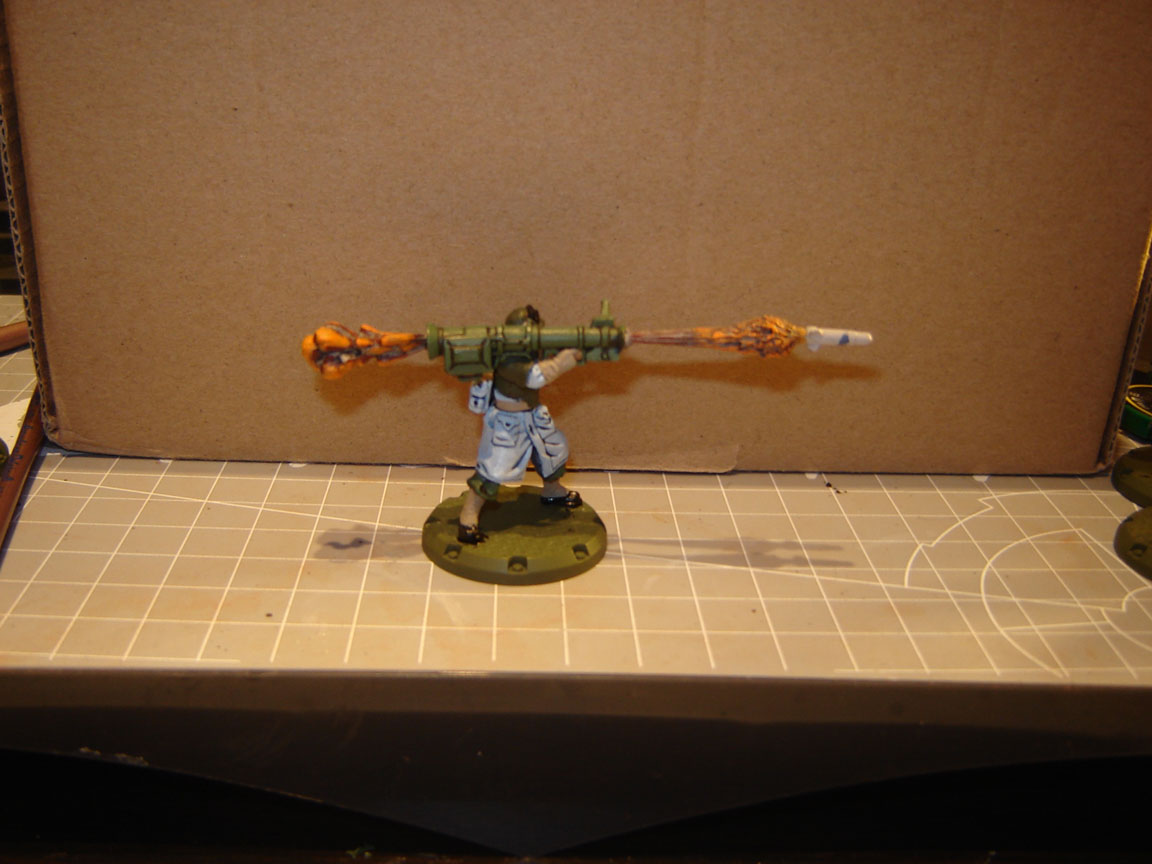
 So today I thought I would show how to paint the explosions of the muzzle fire from armocast.

First I painted Dheneb Stone and then wash with Devlan Mud.
 Then paint over it with Dark Fleshtone.
 Then paint Blazing Orange in the cracks.
 Then paint Golden Yellow in the cracks.
 Then paint Astromicon Grey on the outer sections.
 Then highlight with Codex Grey.
Then wash with Skull White.
And that's it.
One thing I forgot is when done with the last step to lightly go over the front blast with blazing oranges and golden yellow and go over the back with Codex grey. This isnt really something I can show you just got to do it until you like it kinda deal.

July 20, 2011

Hobby Wednesday - Alternative Ammo Crates

So I got an alternative idea for Ammo Crates using stowages and cans.

Its really simple just glue Oil Cans or Stowages to a sheet of plastic the size of a square.


July 13, 2011

Hobby Wednesday

So today is a simple on but it gives an extra to your figures. You will need some clippers and Tamiya German Panzer Grenadier Set 1/48 scale.

In this box there are extras to add to your models you do not need to put the actual models together.

June 29, 2011

Hobby Wednesday

So today is how to paint the Tank Trap Set A and B from Dust Models. These can also be used for the tank traps in the Dust Tactics Core Set and Expansions. Now the whole concept is that Concrete is made of a bunch of greys and tans.

Set A
 Set B
Applied Dheneb Stone to the hole model.
 Then dry brushed Space Wolf Grey over it lightly.
 Then washed it using Devlan Mud
 Next lightly dry brush each in the following order: Codex Grey, Space Wolf Grey.
Then take a red rust pigment and lightly brush some on the models in various areas.
Then paint Dark Skin Tone on the Re-bar areas and highlight with blazing orange.
Next I did the bases using Space Wolf Gray to keep to my arctic theme. You can do whatever you want.
Next take Tamiya Weathering Stick Snow or a Soft Oil Pastel and dab it on the top of the model to make it look like the model has snow on it.
Next I clear coated it with a flat coat.
And there you have it.